Building Your Medkit
- February 3, 2016
- David Miller
- How To
- DIY
- 7 Comments
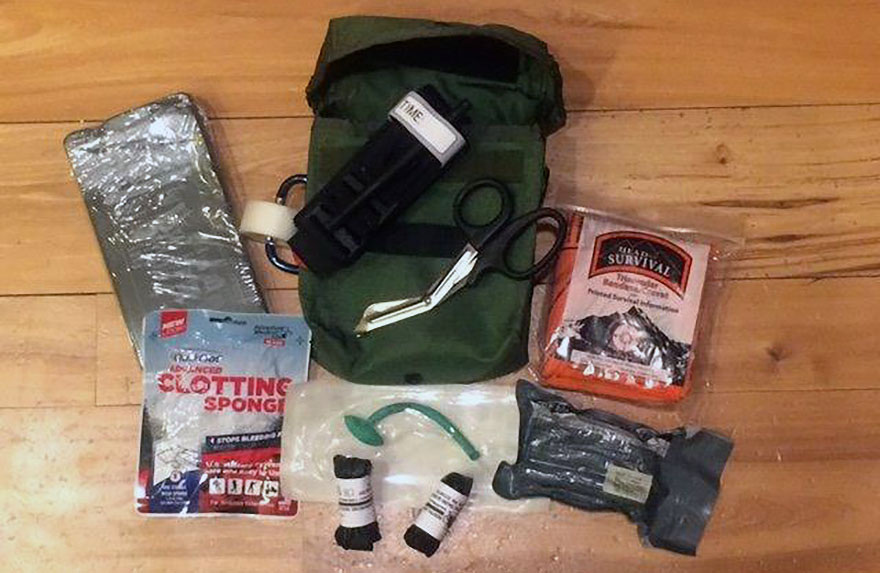
There are many iterations of medkits on the internet at a wide range of prices. You wouldn’t be wrong in spending a bunch of money and getting cool stuff. Conversely, you wouldn’t be wrong getting the less expensive one and adding to it. The problem comes when 1) you don’t have what you really need, 2) you pay for a bunch of filler supplies that you don’t always need or 3) you have no idea how to use the cool stuff in the kit. Considering those three issues, I built my own medkit based on what I thought would be the most helpful in the event of an emergency. I ended up with 10 items in the kit plus the pouch.
The pouch. You can buy fancy if you want to spend the money but I bought an IFAK pouch at the local military surplus store for $5. I then bought some one inch elastic, ShoeGoo, and Velcro to add to the pouch. That added another $5 but could be used on other projects too.
The SAM Splint. I met Sam about ten years ago and really liked him. I’ve been a fan of his company ever since. The versatility of the splint is only limited by your imagination. I saw this as important not only for walking in the woods but, also, for my kids’ sporting events where someone gets injured and comes to me for help. I also have it available when I’m at the range. It is easy to use and is $10.
The tourniquet. I like the CAT brand for no other reason than that is what I started with. It is easy to use and well worth the $32 if you ever need one. I added this to the kit specifically for the range.
Bandages. I like the Israeli bandage better than the emergency trauma dressing even though the Israeli bandage is about two dollars more ($8.50 versus $7.00). I think it’s $2 well spent. I found that many of the pre-made medkits add the ETD (rather than the Israeli) to save a few dollars in total cost of the kit. Other bandages like Coban, plain gauze, or elastic bandages are fine to add as well. For the range, the Israeli bandage is a better choice, while the others listed are fine for the playground.
Triangular bandage. Like the SAM splint, this important item has endless uses. For $10 you get your money’s worth out of it. Using the bandage as a sling or as a dressing is helpful in a medical situation but its applications outside of medicine (eg. Signaling, water filtration, fire tinder) is just as important. A Shemagh is also a great alternative.
Nasopharyngeal airway. I think this will probably be the least used piece of kit included here, however, it could be lifesaving and I wouldn’t leave it out. I remember in band camp in high school watching a kid seize for what seemed like hours and wondered if he would be okay. I still have that picture engrained in my brain. That would’ve been an appropriate place for the use of a NPA and for less than $7 it is a worthwhile addition to the kit.
Coagulant. There are many options out there. I remember when Celox granules came out and everyone was excited. Then they came out with Celox gauze and then the Celox applicator which really seemed like an amazing idea. I remember talking to SAM as he pondered how to use a tampon to get the Celox deeper into the wound. Viola! The Celox applicator ($26)! I would recommend the Celox gauze ($16) because of the price. It costs about the same as the granules ($19) but if you can’t get the granules deep to the bleeder than it won’t matter how much of the granules you pour into the wound. At least with the gauze you can pack it into the wound. QuickClot is another brand that has made some improvements and is a good option. I carry these mostly for the range but if you have ever seen a scalp bleed this could come in handy.
Miscellaneous. I also added a carabiner ($2) to attach the tape ($2) to the outside of my pouch. A cheap pair of bandage shears ($5) sits on the outside of the pouch. You should have some gloves ($.50) in your kit. I have 3 – 4 pairs so I have extra if someone else is around to help.
Other options. It would be easy to add some band-aids from the cabinet as well as some ibuprofen or acetaminophen. I would also recommend adding a Sharpie for $1. A casualty card, face shield, goggles, eye patch, and anything else you want can be added, but most of these items serve as fillers to pre-made kits.
Other things NOT to consider? The most obvious is the chest seal and decompression needle. In 20 years of medicine I’ve used the decompression needle TWICE. The person would have died if I didn’t so I had no choice. You have to know what you are doing with the needle and even then, it may not be a good outcome. Stick with what you know and have the ability to do. Everything that I included in my kit mentioned above is well within your grasp as a bystander. That being said, I do carry a chest seal and decompression needle in my larger medical bag that I carry in my vehicle.
So for less than $100 you have a solid kit and you should know how to use everything in the kit. I believe it is all within your grasp and could make a difference in that 7 minutes until help arrived.
David L. Miller, DO, FACOI
I went to a two hour class where David explained these kits he made. It was very informative with lots of hands on training. Everyone at the class purchased a kit and went home knowing how to use it very cool
Thanks Dave
I went to a two hour class where David had these kits put together and for sale. He went over all the details of how to use the gear with hands on experience. It was very informative and at the end of the day everyone at the class had bought the kits he had prepared AND knew how to use them!!!
Thanks again Doc
Matt Sutton
Great post.
If i may. Maybe consider adding a white or bright Chem light. They don’t need batteries, are light, and cheap.
I change mine out every spring when I move my clocks forward and change my smoke detector batteries so I know they are fresh.
Very informative article. Thanks.
Thanks for the write up, now I have to go shopping. lol
Thanks for taking the time to post this
Great write up for the basic med-kit. I will definitely be adding some of your suggested items to mine.